Select Printable Area Excel
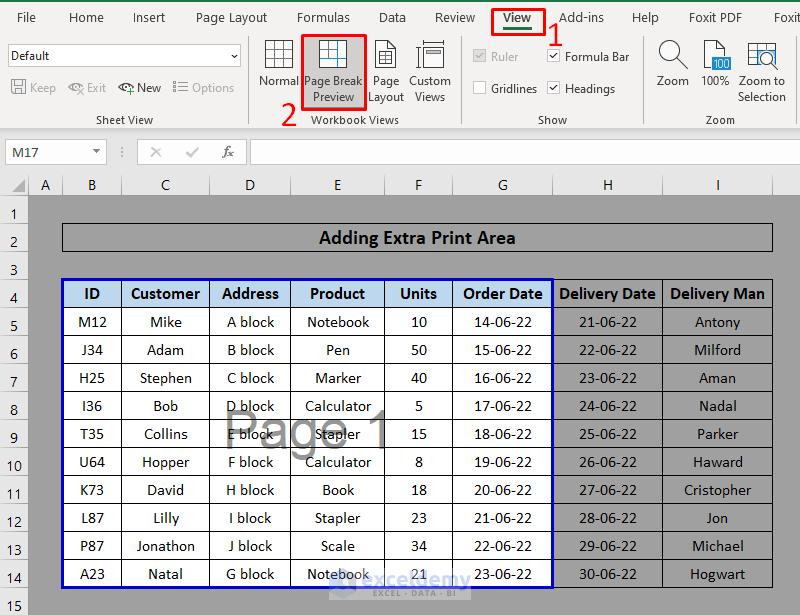
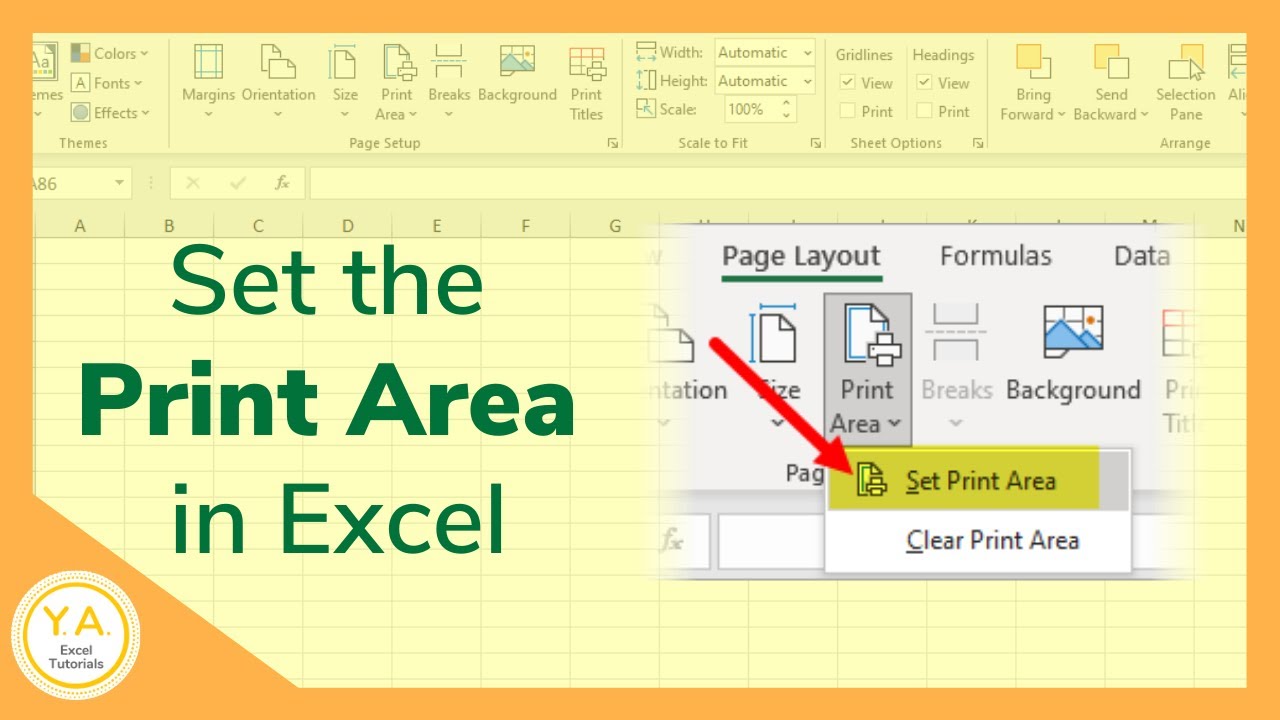
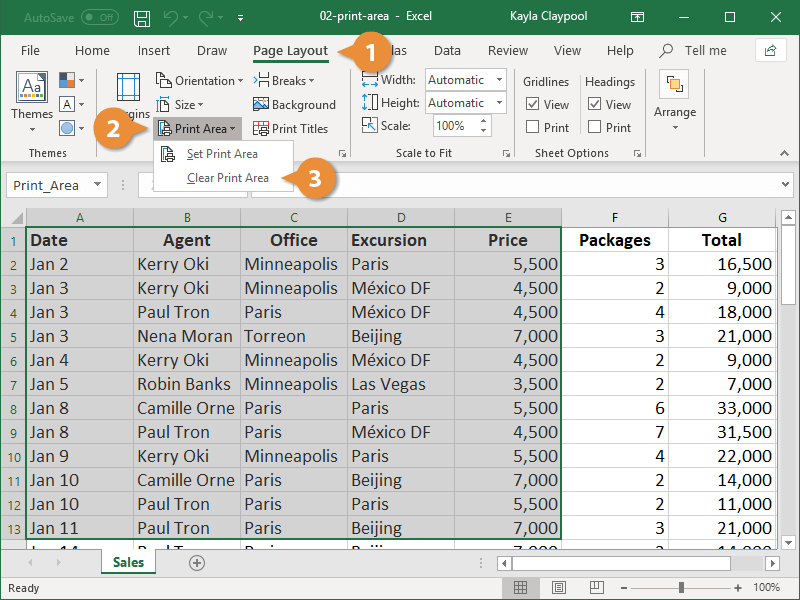
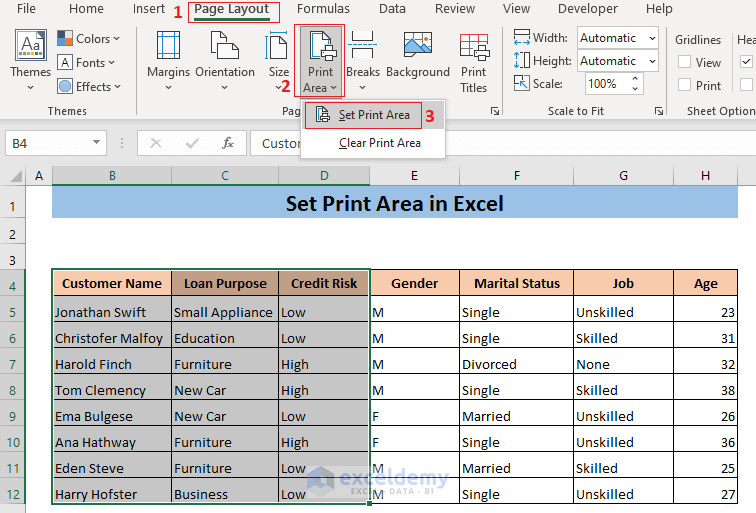
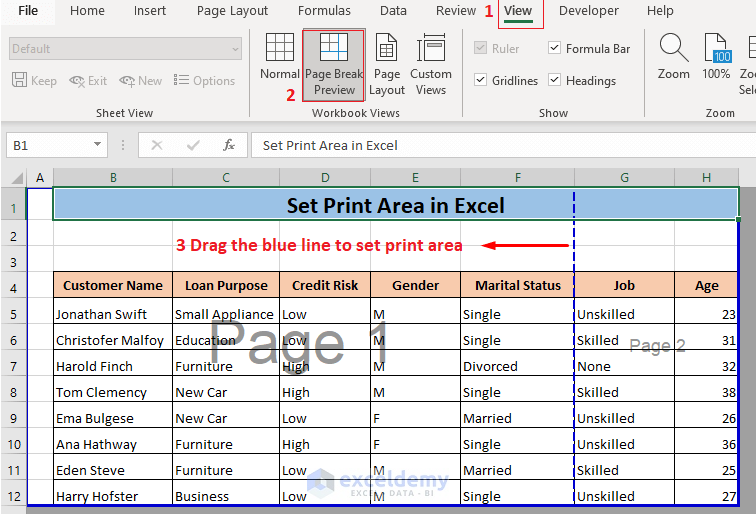
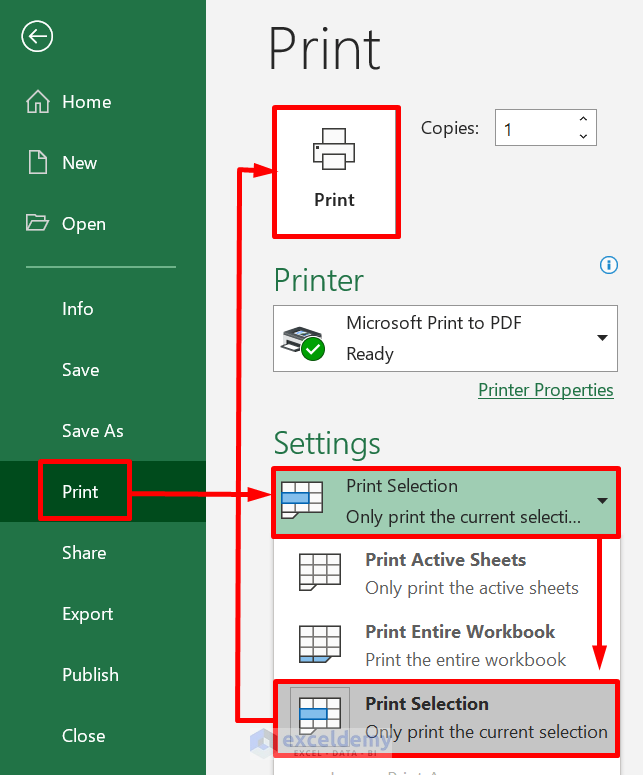
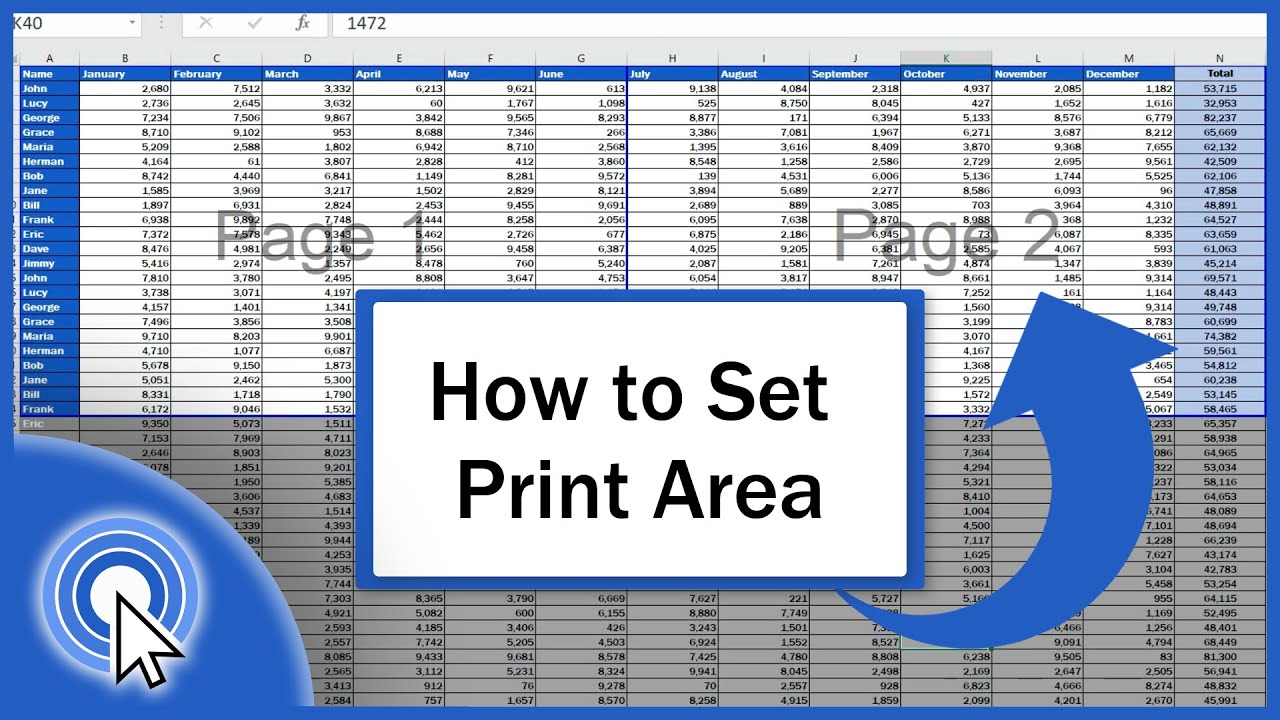
Select Printable Area Excel - With your columns still highlighted, click on 'print area' in the page layout tab and select 'set print area.' this command tells excel to focus only on the. Users can use the excel print area option when they require to print a specific area in a worksheet repeatedly. To set a print area, follow these steps: On the page layout tab, in the page setup group, click print area, and then. Once you've selected your desired area, the next step is to set it as your print area. On the worksheet, select the cells that you want to define as the print area. Here are the steps to follow: To set multiple print areas, hold down the ctrl key and click the areas you want to print. To set the print area, you select the area and hit the set print area command; Sometimes you want to print only a specific selection of cells on a worksheet. On the page layout tab, in the page setup group, click print area. Select a range of cells. We can set print area in google sheets that suits the requirements of the users using cell selection method. Navigate to the page layout tab and select print area, then click set. Here are the steps to follow: Print the selection, define the print area in the page setup dialog, or create the print area. To set a single print area in excel, you can use the set print area command, page setup dialog box, page break preview feature, print selection setting, and excel vba code, as described in. Sometimes you want to print only a specific selection of cells on a worksheet. With your columns still highlighted, click on 'print area' in the page layout tab and select 'set print area.' this command tells excel to focus only on the. To set multiple print areas, hold down the ctrl key and click the areas you want to print. Click on print area and choose set print. You will know the print area is set when you see the gray lines outlining your selection. Navigate to the page layout tab and select print area, then click set. Make sure you include all the relevant cells and columns that you want in the printout. Go to the page layout tab. A print area is a designated part of your worksheet that you want to print. If you’ve forgotten to select a print area in excel and are on the print preview window, no worries. Here are the steps to follow: Go to the page layout tab on the ribbon. This way, excel knows exactly which parts of your spreadsheet to. Once you've selected your desired area, the next step is to set it as your print area. Highlight the area you want to set as the printable area. To set a print area, follow these steps: On the page layout tab, in the page setup group, click print area. Go to the page layout tab on the ribbon. A print area is a designated part of your worksheet that you want to print. Select a range of cells. Print the selection, define the print area in the page setup dialog, or create the print area. To set a single print area in excel, you can use the set print area command, page setup dialog box, page break preview. This way, excel knows exactly which parts of your spreadsheet to include when you. To set a print area, execute the following steps. Click and drag your mouse to highlight the cells you want to print. Make sure you include all the relevant cells and columns that you want in the printout. To set the print area, you select the. In short, you have to navigate to “ page layout ” > “ page setup ” > “ print area ” > “ set print area.” in this article, i’ll show you how to set the print area for microsoft excel. By setting a print area, you can specify which cells should be included on the printed page, helping you.. Once you've selected your desired area, the next step is to set it as your print area. Select the cells you want to include in the print area. This is like telling excel, hey, this is the part i want to print,. On the page layout tab, in the page setup group, click print area. You will know the print. To set a print area, follow these steps: Excel provides three easy ways to print chosen ranges: By setting a print area, you can specify which cells should be included on the printed page, helping you. Click on print area and choose set print. We can set print area in google sheets that suits the requirements of the users using. Download the practice workbook for free and enjoy learning with us! Go to the page layout tab on the ribbon. In short, you have to navigate to “ page layout ” > “ page setup ” > “ print area ” > “ set print area.” in this article, i’ll show you how to set the print area for microsoft. Select a range of cells. You can use the print selection. Make sure you include all the relevant cells and columns that you want in the printout. To set the print area, you select the area and hit the set print area command; Once you've selected your desired area, the next step is to set it as your print area. Learn how to print the selected area in excel on one page with 3 methods. To set a print area, execute the following steps. Make sure you include all the relevant cells and columns that you want in the printout. Select a range of cells. Navigate to the page layout tab and select print area, then click set. In short, you have to navigate to “ page layout ” > “ page setup ” > “ print area ” > “ set print area.” in this article, i’ll show you how to set the print area for microsoft excel. Users can use the excel print area option when they require to print a specific area in a worksheet repeatedly. This way, excel knows exactly which parts of your spreadsheet to include when you. Highlight the area you want to set as the printable area. To set multiple print areas, hold down the ctrl key and click the areas you want to print. Print the selection, define the print area in the page setup dialog, or create the print area. If you’ve forgotten to select a print area in excel and are on the print preview window, no worries. Set print area in excel using print selection. Select the cells you want to include in the print area. With your columns still highlighted, click on 'print area' in the page layout tab and select 'set print area.' this command tells excel to focus only on the. Sometimes you want to print only a specific selection of cells on a worksheet.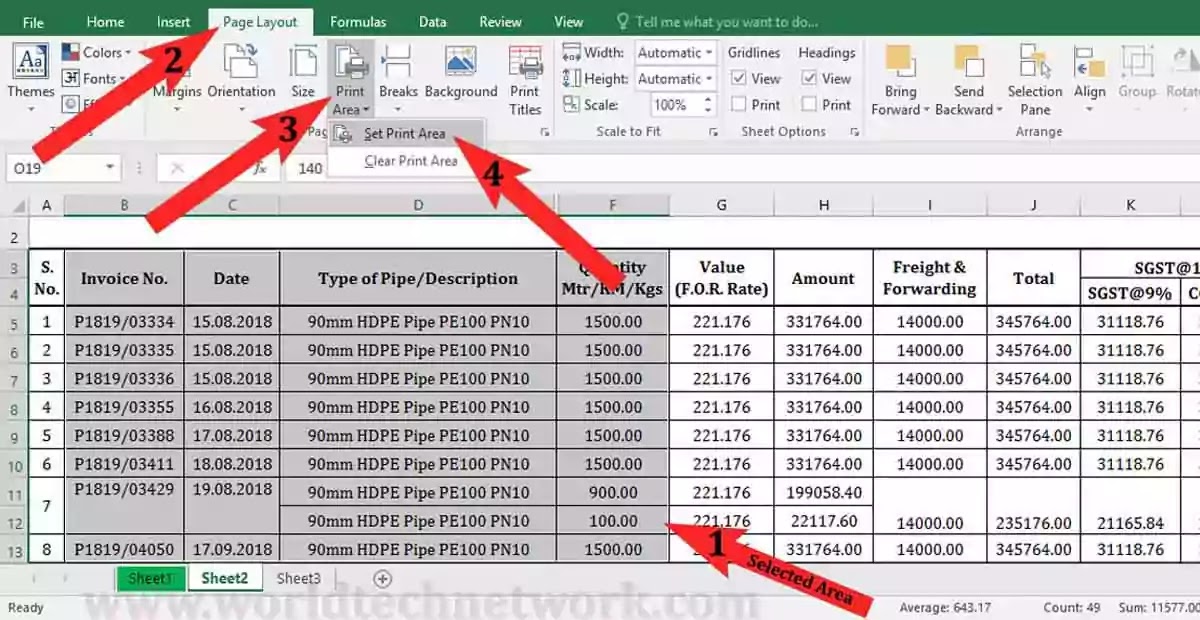
Select Printable Area Excel
Select Printable Area Excel
Select Printable Area Excel
How to Set Print Area in Excel CustomGuide
:max_bytes(150000):strip_icc()/ExcelClearPrintArea-5c1c287ac9e77c000159666f.jpg)
How To Select Printable Area In Excel
How To Select Printable Area In Excel
How To Select Printable Area In Excel
How to Set Print Area in Excel (5 Methods) ExcelDemy
How to Print Selected Area in Excel on One Page (3 Methods)
Select Printable Area Excel
To Set A Print Area, Follow These Steps:
Excel Provides Three Easy Ways To Print Chosen Ranges:
Here Are The Steps To Follow:
To Set The Print Area, You Select The Area And Hit The Set Print Area Command;
Related Post: